This document provides a technical breakdown of the "Audio to Video Converter," a Python application built with tkinter. The application serves as a user-friendly graphical interface for the powerful command-line tool FFmpeg, allowing users to easily convert multiple audio files into videos by pairing them with a static image.
The application is built entirely in Python and leverages several key libraries and modules to achieve its functionality:
ttk themed widgets are used for a more modern look and feel.stdout and stderr), and monitor their status.os module is used for file system operations, like extracting filenames from full paths, while the re (regular expression) module is used to parse text output from FFmpeg to determine video duration and conversion progress.The application is encapsulated within a single class, YouTubeAudioBatchConverter, which manages the application's state, UI, and logic.
When the application starts, the __init__ constructor:
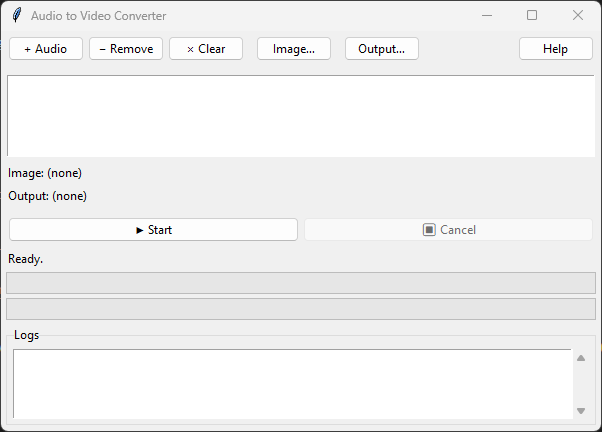
tkinter window (self.root).ttk.Style for the UI elements.self.audio_files, self.image_file, and self.output_dir.self.create_widgets() to build the entire user interface as shown in the screenshot. The UI is logically divided into frames: a top toolbar, a file info section, a controls row, progress bars, and a logs console.log_queue via self.process_log_queue, allowing messages from other threads to be displayed in the UI.The user interacts with the application through the buttons in the toolbar:
filedialog prompts, allowing the user to select input files and an output directory. The selections are stored in the class variables and the UI labels are updated accordingly.self.audio_files list and the visible audio_listbox.This is the core logic of the application, handled by a background thread to keep the GUI responsive.
start_conversion method. This method first validates that an audio file, an image, and an output directory have all been selected. It then disables the "Start" button, enables the "Cancel" button, and launches the run_batch_conversion method in a new daemon thread.run_batch_conversion method iterates through each audio file selected by the user. For each file, it constructs and executes a specific FFmpeg command.ffmpeg -y -i "audio_file.mp3" -loop 1 -i "image_file.png" -c:v libx264 -tune stillimage -c:a aac -b:a 192k -pix_fmt yuv420p -shortest -vf "scale=...:pad=..." "output_file.mp4"-y: Automatically overwrites the output file if it exists.-i "audio_file.mp3": Specifies the input audio file.-loop 1 -i "image_file.png": Specifies the input image and loops it indefinitely.-c:v libx264 -tune stillimage: Uses the efficient H.264 video codec, optimized for static images.-c:a aac -b:a 192k: Uses the AAC audio codec with a bitrate of 192 kbps.-pix_fmt yuv420p: Sets the pixel format to ensure compatibility across most players and platforms.-shortest: Ensures the video output duration matches the shorter of the inputs (in this case, the audio file).-vf "...": Applies a video filter to scale the image to fit within a 1920x1080 frame, adding black bars (padding) if necessary to maintain the aspect ratio.get_audio_duration method runs a separate, quick ffmpeg -i command. It parses the command's text output with a regular expression to find the audio file's total duration.subprocess.Popen. This is crucial as it allows the script to read the command's output streams (stdout and stderr) in real-time.stderr stream, which look like time=00:01:23.45 .... The run_ffmpeg method reads these lines one by one.time_re) is used to extract the current timestamp from the progress line.file_progress bar is updated. Critically, this UI update is sent to the main thread using self.root.after(), as directly modifying tkinter widgets from a secondary thread is not safe.log() method places the message string into self.log_queue. The process_log_queue method, running on the main GUI thread, periodically checks this queue for new messages and safely inserts them into the scrolledtext widget. This prevents race conditions and ensures smooth UI updates.self.cancelled flag is set to True, and the self.process.kill() method immediately terminates the running FFmpeg process.